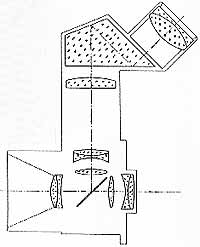
![]()
Sociedad Ibero-Americana de la Historia
de la Fotografia Museo Fotográfico y Archivo Historico "Adolfo Alexander"
Fórum Yahoo [maquinas russas]
Voigtlander
Prominent
A TRIBUTE TO:
The lowest priced of the German Top Cameras!
The most intelligent system!
The highest scope with less equipment!
The only system camera to have strobe synch up to
1/400 (1/500)!
The only of the great to mix ambient and strobe light
in an ample scope!
With the reflex housing, One
does not loose viewing before, DURING or after the shot
You see the flash through the reflex finder!
It presented a new Philosophy of taking pictures.
Didnd touch the buyers. Now almost forgotten!
The public was not ready for such a product. It needed
some optics knowledge!
Today we can state that its basis is still ahead of
general top products.
We will try to explain the Prominents really prominent Phylosophy!
This was an absolute new based idea. None followed.
At that time, all Range finder cameras had a couplable fitted Reflex housing.
This one had a Reflex housing with a couplable fitted camera!
Both works as a single unit, are very reliable and the
100mm in the reflex propiciates better focusing
abilities and better pictures mainly on slides.
It was obtained a simple camera with the best of both
worlds (RF/SLR).
I use this camera since 1957 and know that it is more
reliable and fitted to various photo tasks (mainly the complicated) than their
much more costly partners Leica and Contax.
This
camera is the first of a series. Compur Rapid and
1-1/400 shutter speed. All the others go to 1/500.
A
quality camera could be reached through the well choosen
materials in its construction, a well done workmanship and building a
reliable project.
A
top camera should have the best lenses and an ample photosystem compatibility.
A low cost
camera imposes high production level (and sales); a minimum of quality control
stages, not to onerate production, and a simple and
quick production time lag.
The equation
was solved through the sharing of the body and mechanical parts with other
camera types.
Use
of already known reliable items of high level production. So this camera shared its shutter with Bessa 6X9 types These shutters
were also used by Linhof, Rollei,
Futura and Super Ikontas.
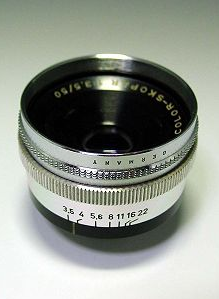
Top lenses of
the era were also used. Three normal lenses were offered:
The old and
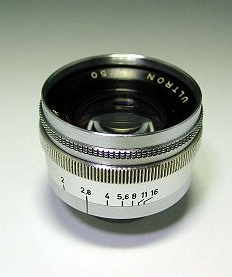
reliable Skopar, the famous Nokton,
used and proved in WWII as the sharp lens for night photography, and the newly
developed Ultron, that some claims better than the
famous Summicron of nowadays.
This original Ultron, survives today, and improved up to 1.8 as
Helios-103 from
This camera, had many technical firsts. Was the first one to use Retrofocus Skoparon 35mm wideangle in a rangefinder camera, that in 1951!
The second one
was Kioceras Contax of
1993! Only 42 years delay!
And
also the fantastic Ultragon 24mm in reflex housing in
1955 which covers 6X6 format! Cost and
manufacturing difficulties prevented to go to normal production run,
And here the most intelligent part of
the system:
Pehaps (or
clearly) the true heart of the system.
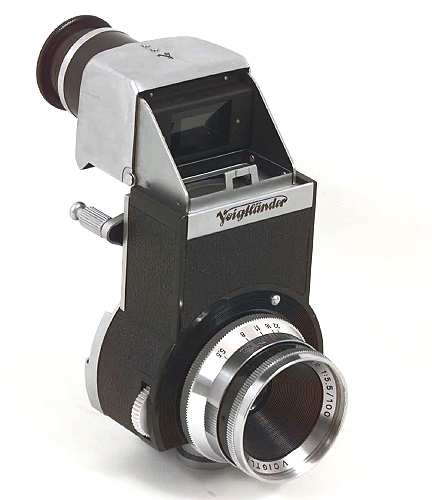
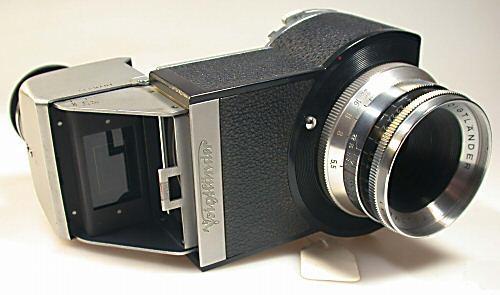
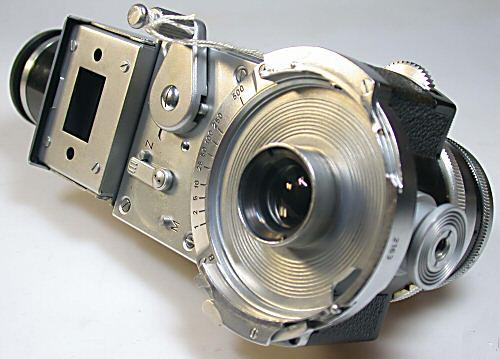
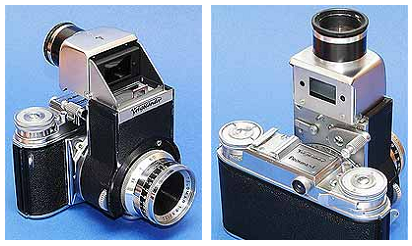
The unique Reflex Housing! similar to none!
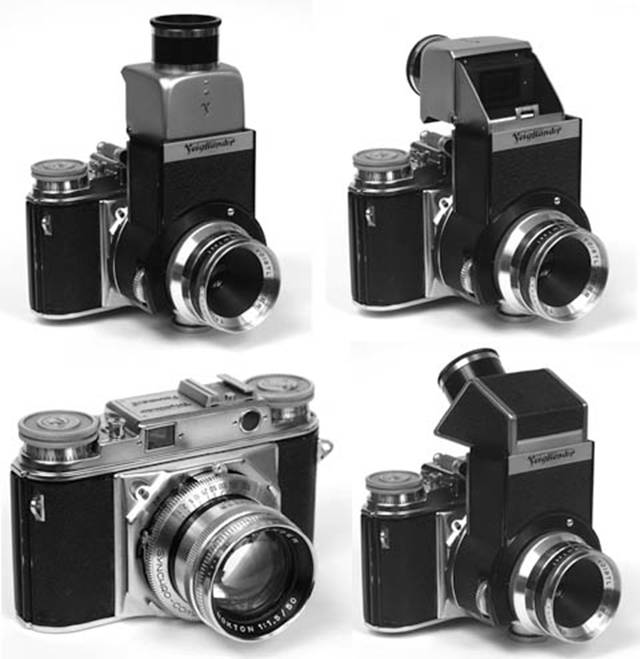
Here the original Reflex Housing instructions.
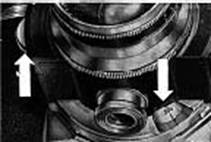
How
to Fit and Detach the Reflex Housing
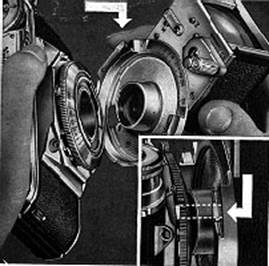
First set the focusing knob on the camera to infinity. Press down the
bayonet catch (see top arrow), and place the reflex housing flat against the
shutter speed ring, so that the upper right-hand cheek on the camera engages in
the locking groove of the bayonet mount (see detailed view, lower right,
above). A slight left-hand turn of the reflex housing firmly locks it to the
camera. The camera focusing knob will become inoperational.
To remove the housing, depress the bayonet catch, and keep it pressed
down. Turn the reflex housing to the right, and lift off.
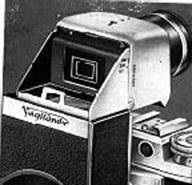
Focusing the Finder Image
The standard equipment of the reflex housing includes the magnifier
attachment shown above. It has a focusing eyepiece. This has a double
purpose. In its vertical position it serves for observing and focusing the
upright screen image. This image is completely free from any parallax error.
When tilted over backwards it becomes the Voigtlander
KONTUR sports finder.
Focusing on the Screen. The
screen image, which is uniformly bright right into the corners of the screen,
is observed through the 5x magnifier lens. To adjust the magnifier exactly to
your individual eyesight, point the camera lens at the sky. Then turn the
eyepiece (see arrow) until the cross on the screen is absolutely sharp. Leave
the eyepiece in this position.
To focus the image with the magnifier, turn the front ring of the lens
mount until the image is dead sharp. Always focus at full aperture, as the
screen is then at its brightest.
The KONTUR Sports Finder
The in built KONTUR finder is extremely useful for following moving
subjects. After focusing (on the screen or by scale) tilt
the magnifier head back as far as it will go. You now have a perfect sports
finder.
Sight the subject with both eyes open. The eye looking past the finer
then sees the subject in its full size and brightness, while the other eye sees
the outline of the picture area. This works equally well whether the subject is
in brilliant sunshine, or in deep shadow.
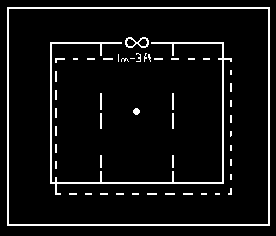
To compensate the parallax error with views closer than about 6 feet,
swing the magnifier head slightly forward until it clicks into place.
The eye looking into the finder sees two rectangles, indicating the
picture area, against a dark background. The outer rectangle corresponds to the
view of the 100 mm. Telomar. The dot marks the centre
of the picture.
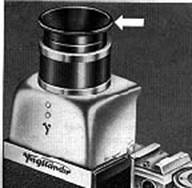
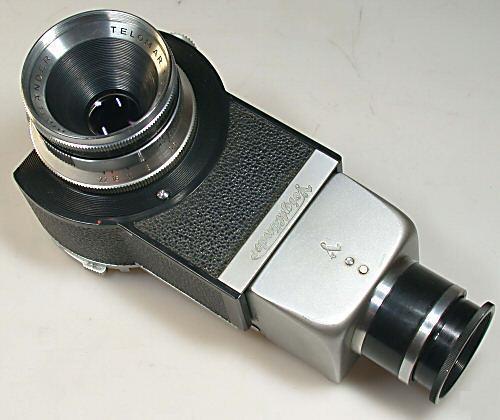
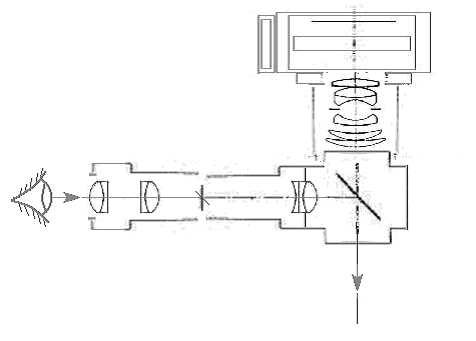
The PRISM FINDER for Direct Screen
Viewing
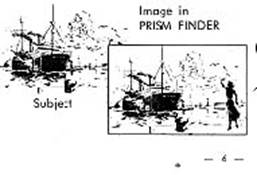
With certain subjects it is better to see the screen image the right way
round. In a case like that, the PRISM FINDER, available as an accessory, is
useful. To change over, pull the standard magnifier backwards out of the screen
frame, and slide in the PRISM FINDER in its place.

The PRISM FINDER shows a moving subject in its true direction.

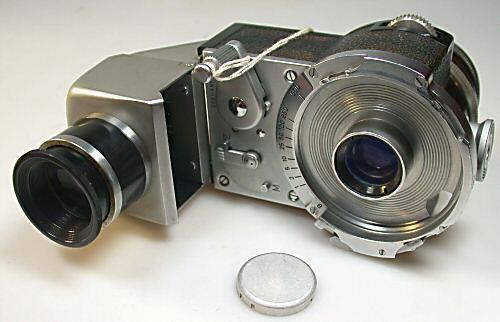
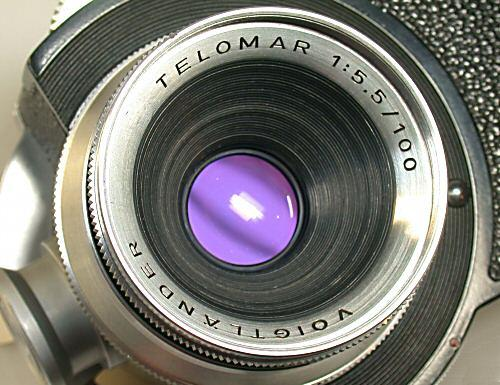
The front component of the 4 inch (100
mm.) TELOMAR f/5.5 is mounted in a bayonet fitting. This
makes the reflex mirror inside the housing accessible for cleaning if required.
But please remove any dust only with a fine brush, to avoid scratching the very
delicate reflecting surface.
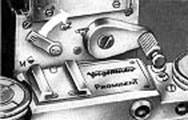
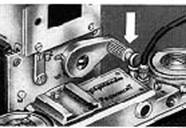
Manipulation:
Depress the button on the front of the reflex housing (see arrow in
illustration), turn the front component to the left or right through 60 degrees,
and remove. When replacing, first align the red index line opposite the red
slot (shaded in illustration) and turn the front conponent
to the left until the bayonet catch clicks into position.
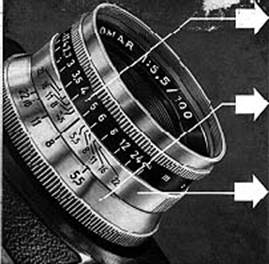
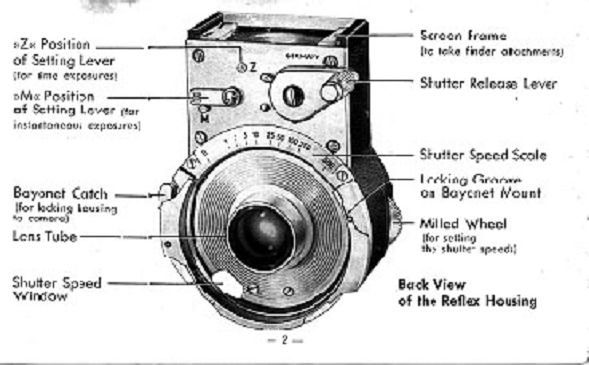
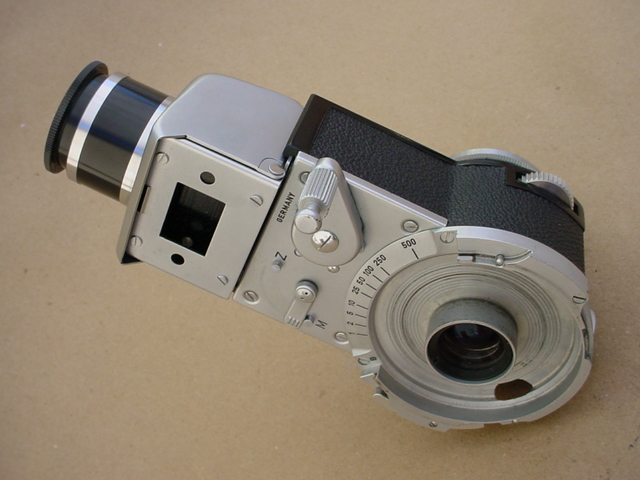
Distance (top arrow)
The rotating front ring of the lens mount carries the focusing scale. To
set the distance by scale instead of focusing on the screen, set the
appropriate distance figure above the red index line.
Aperture (centre
arrow)
The aperture numbers 5.5, 8, 11, 16 and 22 are engraved on the conical
ring on the reflex housing. To set the aperture, turn the ring until the
required aperture or f/number clicks into place opposite the red index line.
Depth of field (lowest arrow)
The aperture numbers are placed in pairs simetrically to the distance reference mark. This
corresponds to the depth-of-field scale. All distances encompassed between equal right and left diaphagm numbers corresponding to real diaphagm
settings, results in clear sharp focus in the final photograph.
Exposure Times
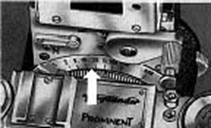
To set the exposure time, turn the milled wheel which protrudes on the
right of the reflex housing (see left-hand arrow). The shutter speeds can be
read off either from the front in the shutter speed window, or from behind on
the shutter speed scale (see arrow in right-hand illustration). The appropriate
speed division should coincide with the red index line.
Instantaneous Exposures
These can normally be made without a cable release. Push the setting
lever to the left to position "M". Then set the shutter speed,
tension the shutter in the usual way, and depress the release lever on the
reflex housing as far as it will go allowing the shutter to run down fully.
The mirror inside the housing automatically moves out of the way just
before the shutter opens, to allow the light to reach the film.
Exposures with the Self-Timer
After tensioning the shutter and setting the delayed action mechanism
(see camera instructions), depress the release lever. The delayed action
mechanism is now running down. So, immediately move the setting lever to
position "Z" while the release lever is pressed down. This keeps the
mirror out of the way.
Time Exposures
Screw a cable release into the cable release socket, move the setting
lever to "Z" and set the shutter to "B". Press down the
shutter release lever on the reflex housing as far as it will go.
This moves the mirror out of the way while the shutter is still closed.
Open it for the exposure in the normal way by pressing the cable release.
Descriuption of
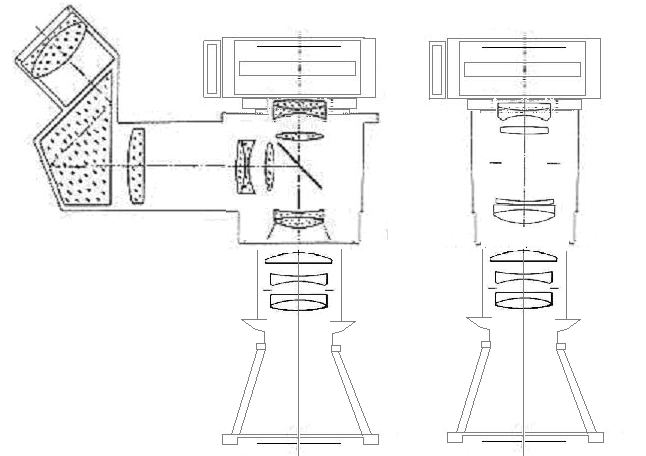
parts:
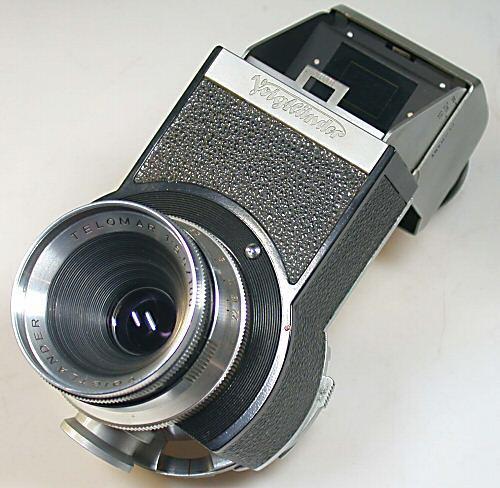
Reflex housing and Telomar 5.5/100
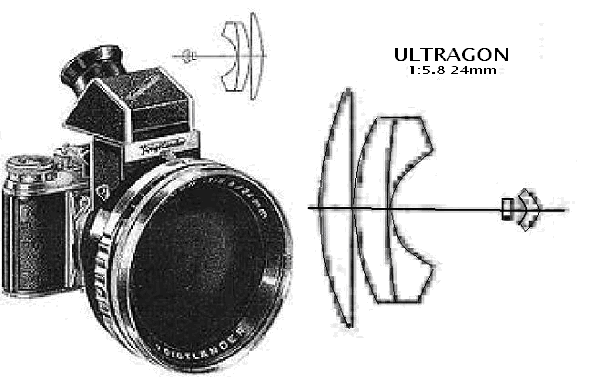
Ultragon 5,8/24
Skoparon 4.5/35mm
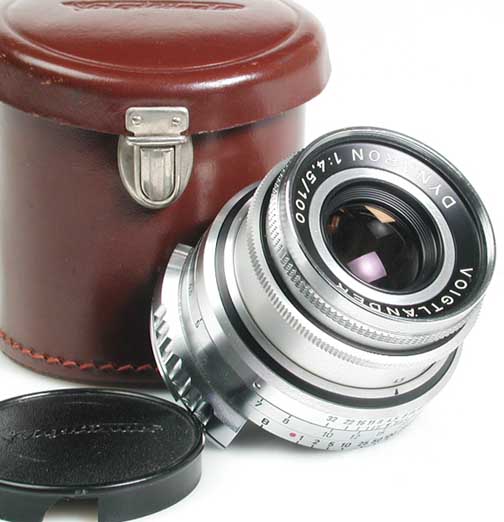
Dynaron 4.5/100
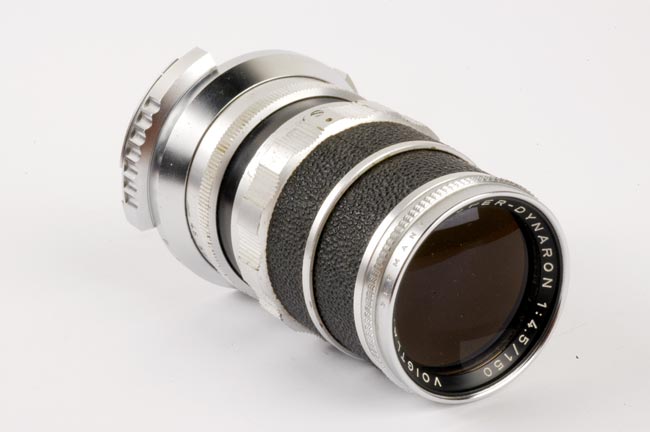
Super-Dynaron 4.5/150
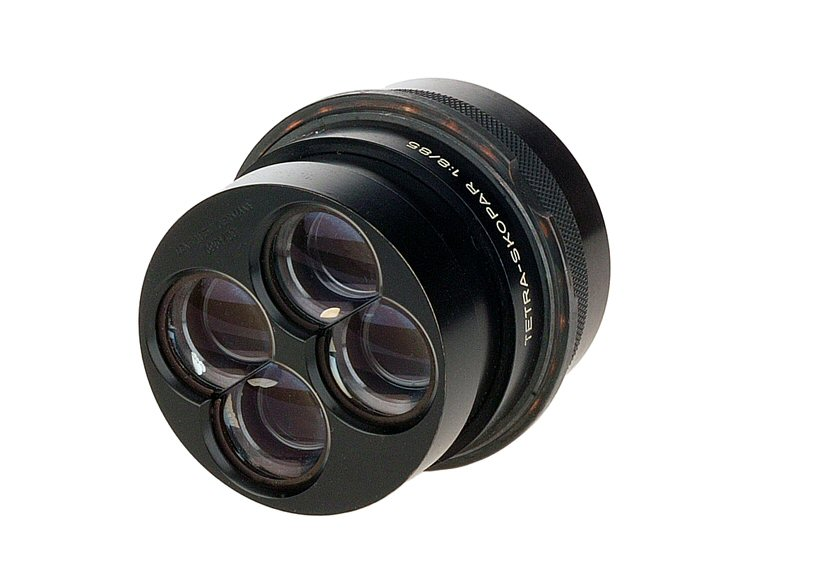
The Ultra rare Tetra Skopar 8/85 intended to make four simultaneous equal pictures on film.
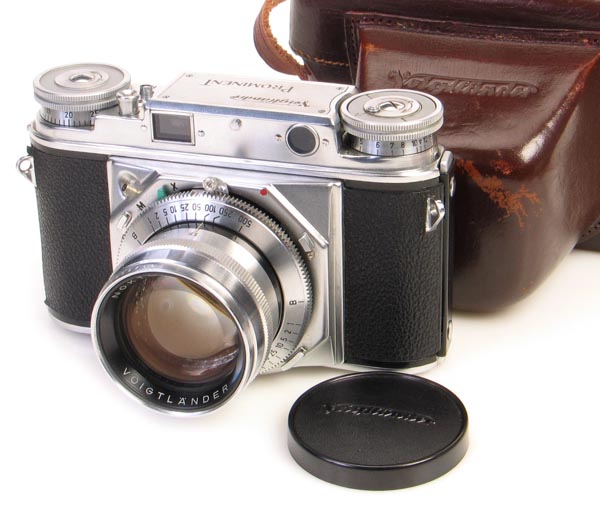
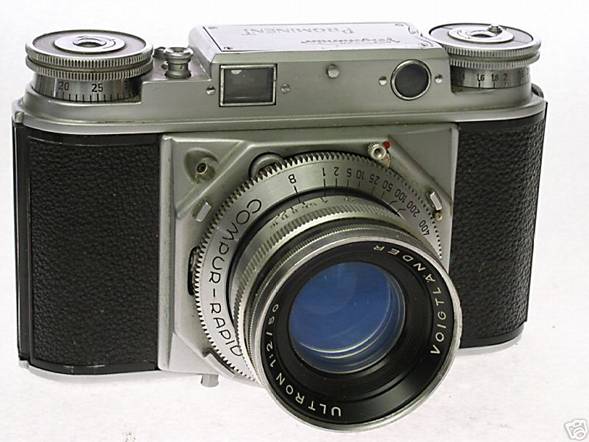
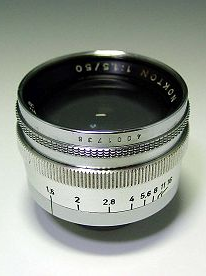
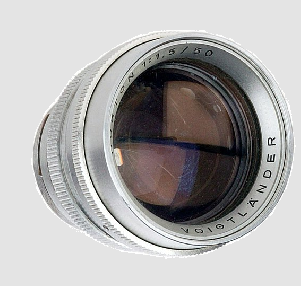
Prominent camera with Nokton lens
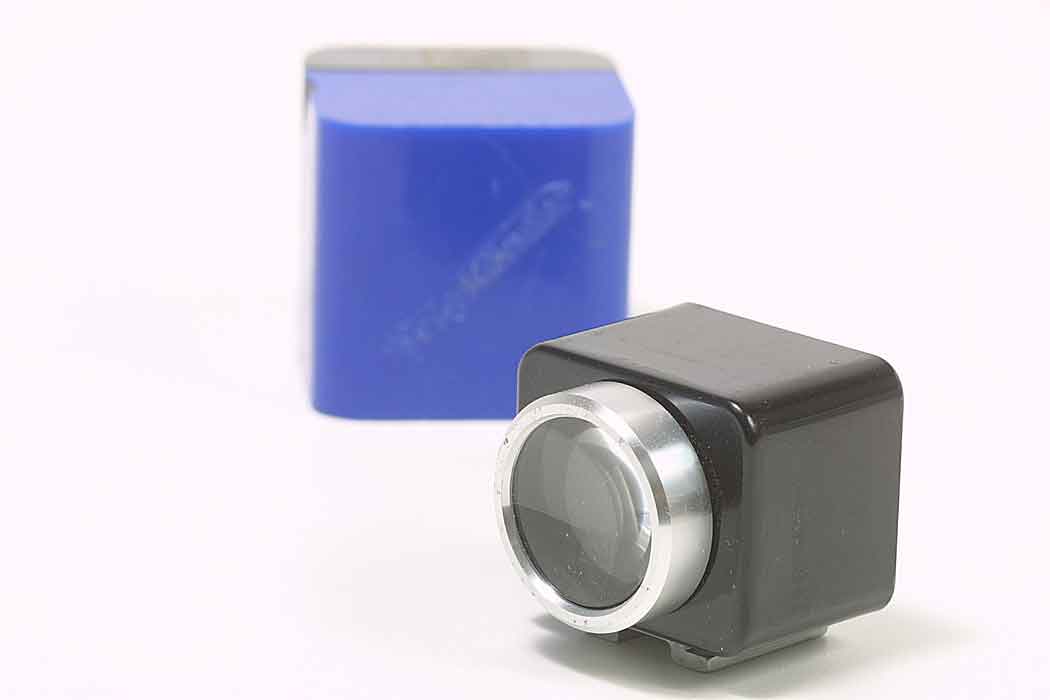
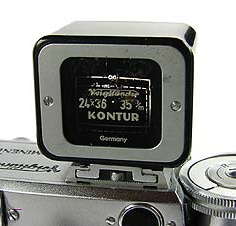
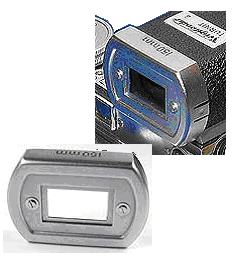
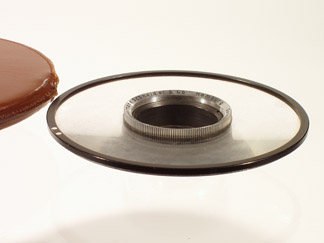
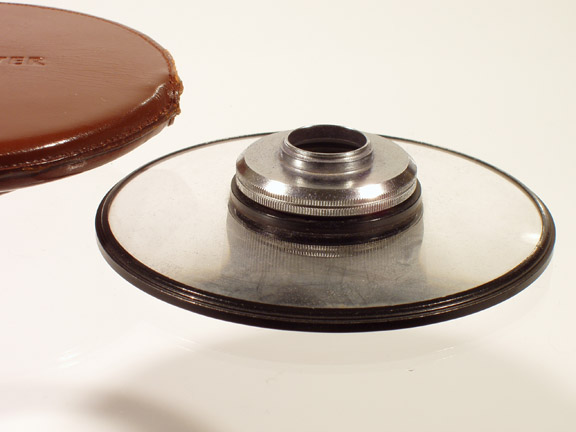
The Kontur
finder
Kontur frame
viewing
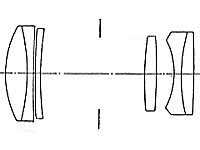
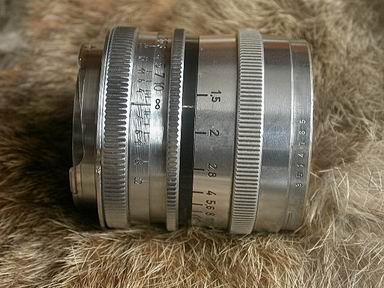
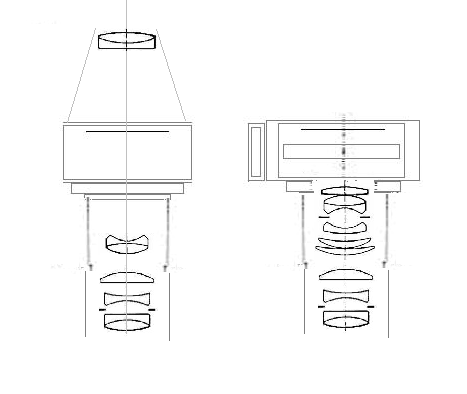
The
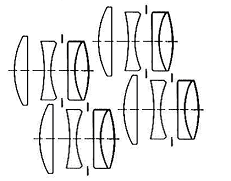
Skopar 3.5/50
and diagram Ultron 2/50 and diagram Nokton
1.5/50 and diagram


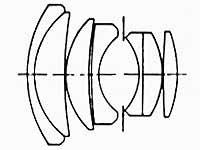
Nokton 1.5/50
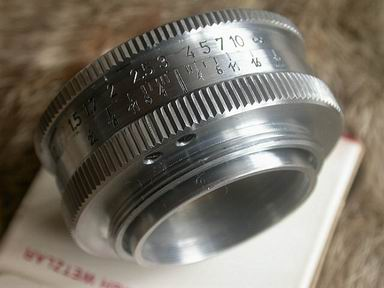
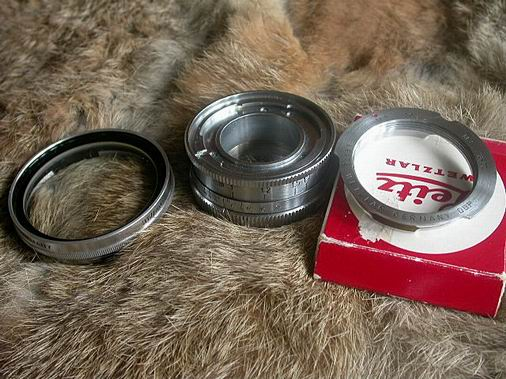
was also manufactured for Leica screw and Contax inner bayonet mount,
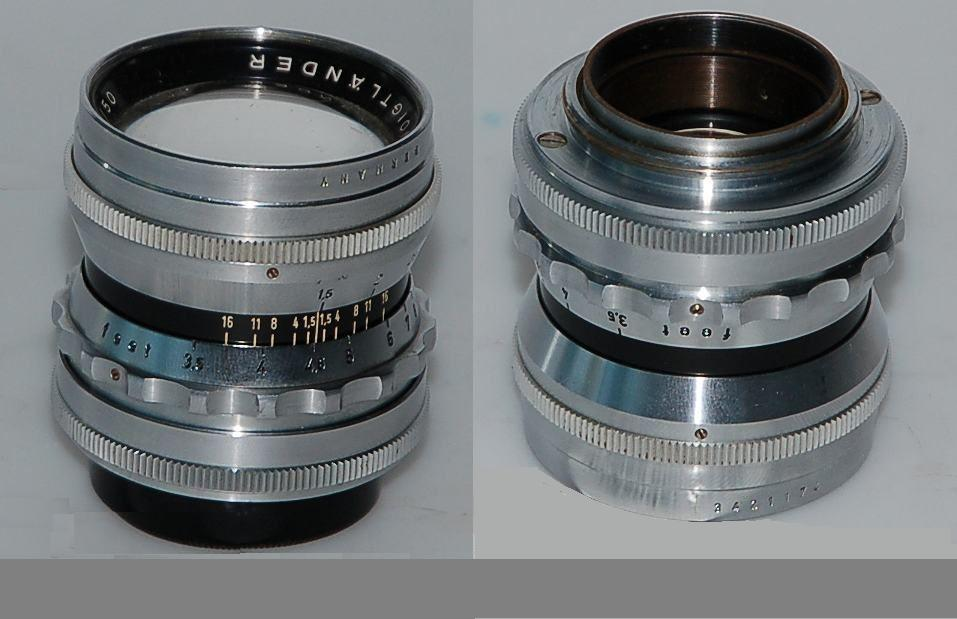
Voigtlander also
built a special Leica adapter for using Prominent famous normal lenses on Leica
body.
Here the Kit including a Leitz screw-to-M adapter.
The Kontur
finder
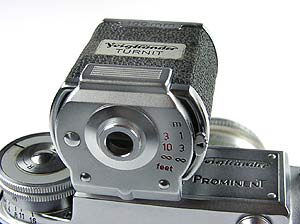
The Kontur finder is a reversing finder that you can see
through both lens sides, enlarging or diminishing the
images So it can be used on 35 and 100mm lenses. You have a primary ocular mask
used to be the seeing side. Lenses reverse at desired focal length. A complementary front mask lets it to be used
with 150mm telephoto.
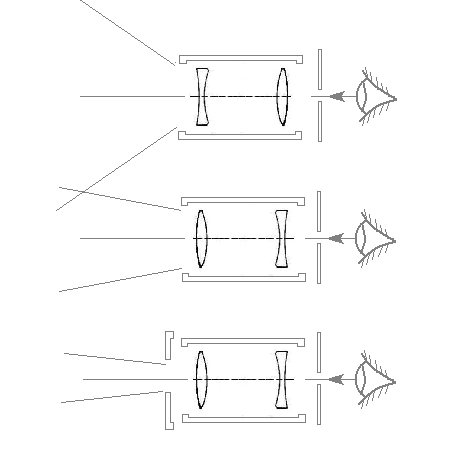
KONTUR
use diagrams. From top: 35mm, 100mm, and 150 fields.
The
eye side has always a limiting mask useful for parallax compensating.

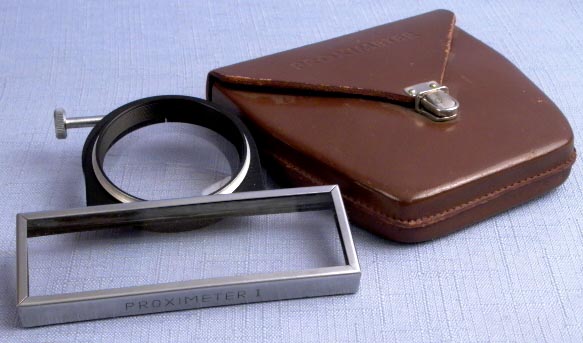
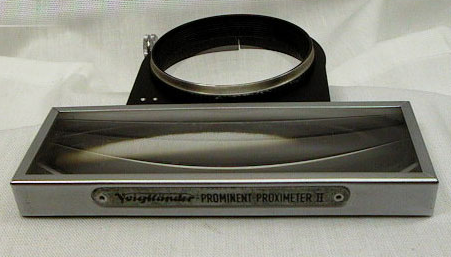
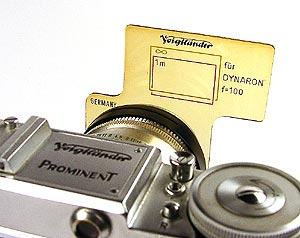
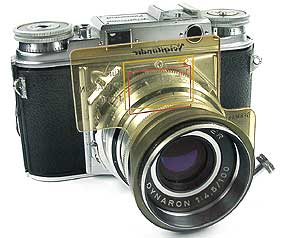
The Proximeter is
within the Voigtländer Prominent system, an item of special importance;
particularly since, besides the normal lenses, it also works in connection with
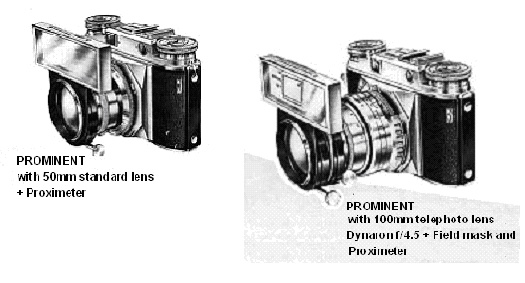
the Dynaron 1:4,5/100 mm as in the above illustration.
Reproduction scale can reach up to 1:2,5
without the disadvantage of the coupled telemeter
having to be renounced.
Manufacturer of the ProximeterI and II
was Hermann Schneider & Co., Hamburg.
xxxxxxxxxxxxxxxxxxxxxxxxxxxxxxxxxxxxxxxxxxxxxxxxxxxxxxxxxxxxxxxxxxxxxxxxxxxxxxxxxxx
xxxxxxxxxxxxxxxxxxxxxxxxxxxxxxxxxxxxxxxxxxxxxxxxxxxxxxxxxxxxxxxxxxxxxxxxxxxxxxxxx
Instructions For
Use
The Proximeter close-up attachment is
available in two focal lengths covering the following focusing ranges:
Proximeter I
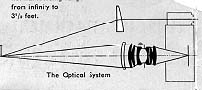
(focal length 38 inches or 95 cm.): 38 to 18 inches (95 to 47.5 cm.)
Proximeter II
(focal length 20 inches or 50 cm.): 18 to 13 inches (49 to 32.5 cm.)
Combining the Proximeter I and II produces a
focal length of 13 inches (33 cm.) covering a focusing range from 13 to 9.5
inches (33 to 24 cm.)
Mounting
the Attachment. Slack off the milled screw at the side
of the Proximeter, push the clamping ring over the
lens mount, and tighten the screw. Make sure that the metal frame of the Proximeter is parallel to the top edge of the camera. When
using two units together, always mount the Proximeter
II on the camera lens and the Proximeter I on the front
mount of the Proximeter II; never the other way
round!
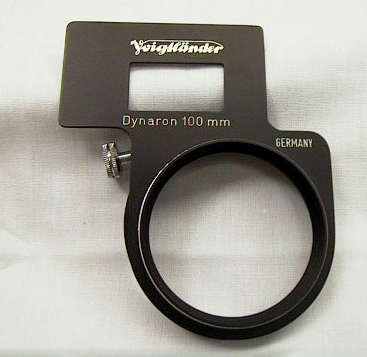
Field
Mask. For shots with the 4 inch (10 cm.) Dynaron f/4.5 telephoto for the Prominent
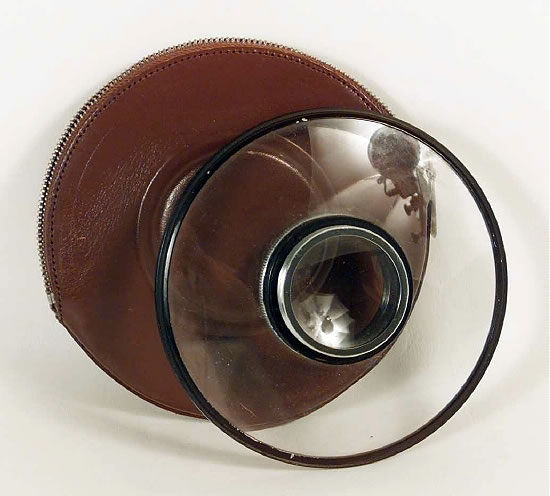
Another Proximeter
version with a round lens around the camera optics lens accessory made by the
same manufacturer was intended for cameras having revolving objective while
focusing. Like Contax, and Leica when with Elmar and Hektor 50, 73, 90, and
135mm. Here three pictures of this other version.
Here you see the
two versions of the frame limiter when using the 100mm lens.
The plastic is the
last one while the all metal is the first.
The limiter can be
used always when using the telephoto and acts somewhat like a universal finder
with coupled rangefinder. You see the frames for parallax. Easier than a reflex
camera, precise like them.
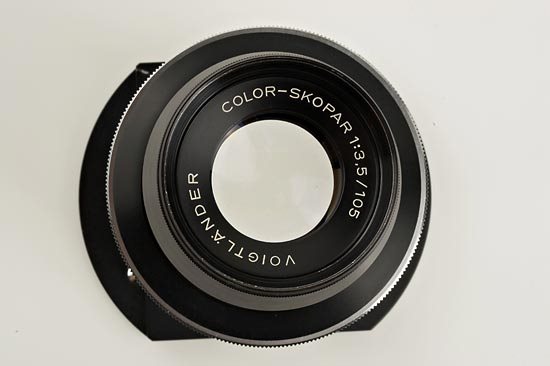
Here the special accessories for macro,
repro and miocro:
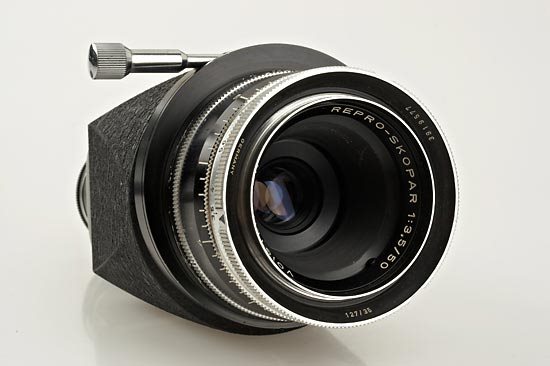
At left the Repro-Skopar 3.5/50 1:1 repro device coupled to camera simulator
for framing and focus
The optical unit
goes over the normal 50mm lens
At right the
Color-Skopar 3.5/105 - 1 :1 copying unit when using with Dynaron 100mm lens or the Telomar
in reflex housing,
Below we see the
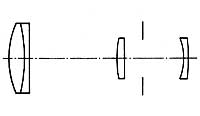
optical diagrams of both items:
Here, the Repro-Skopar.
At left mounted in
the picture simulator with loupe.
At right mounted
in the camera with Ultron Lens
Here, the Color Skopar.
At left mounted
together the Telomar reflex with camera.
At right mounted
together Dynaron telephoto with camera
This
procedings results in an exceptionally good picture
quality, because this arrangement delivers an apochomatic
reproduction optical system;
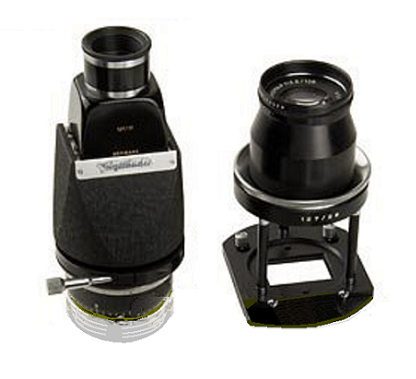
Microscope adapter
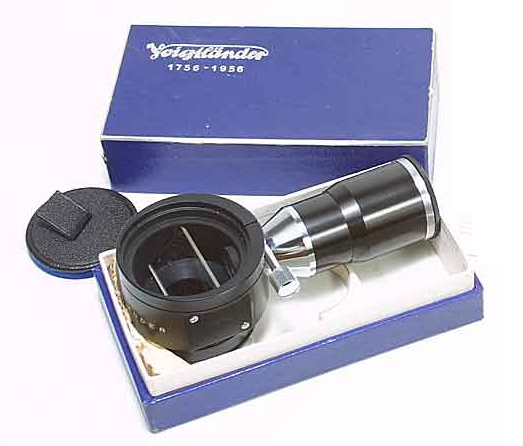
Diagram of Microscope/telescope
adapter.
This is the
arrangement of camera and microscope device.
It is used with
camera/lens unit over the normal lenses Skopar or Ultron.
The observer sees
through the device focusing eyepiece a clear wire cross.
Camera is set at
infinity position. The whole assembly goes over the microscope eyepiece place,
with or
without the eyepiece in position, according with the desired enlargement.
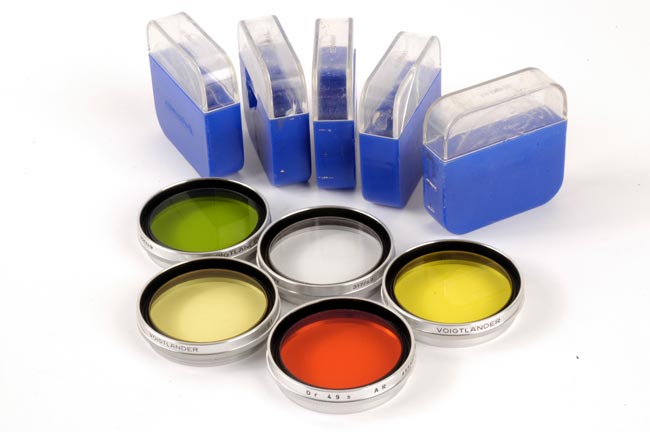
Above
set of filters below sunshade and two Focar
close-up lenses.

FOCAR 1 = +1.25 diopters
FOCAR 2 = +2.25 diopters
FOCAR 1+2 = +3.5 diopters
And one of the oddly accessories made- The Flash everready case !
We cant find similar solution in no
other camera maker.
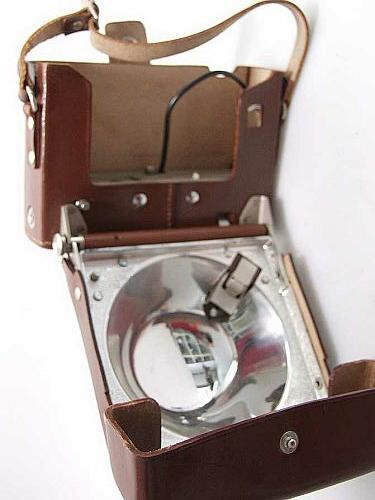
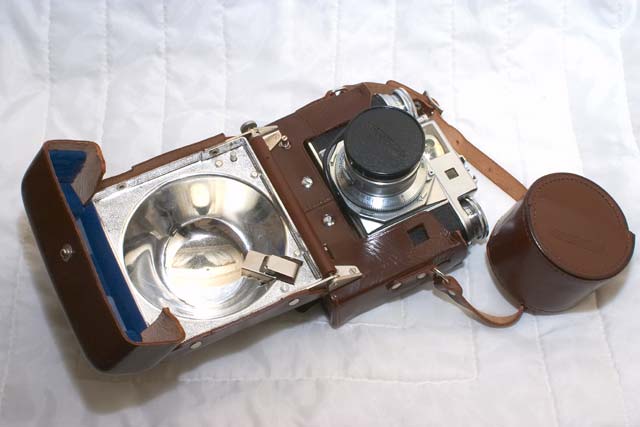
Prominent II in the flash case. This same case fit all Vitessa models
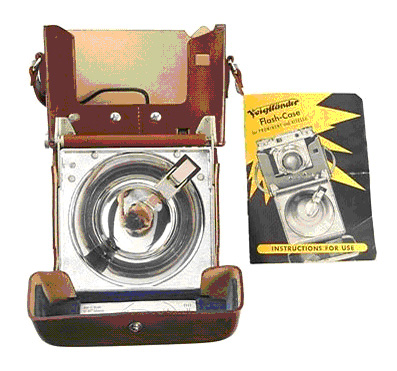
Flash case and instructions
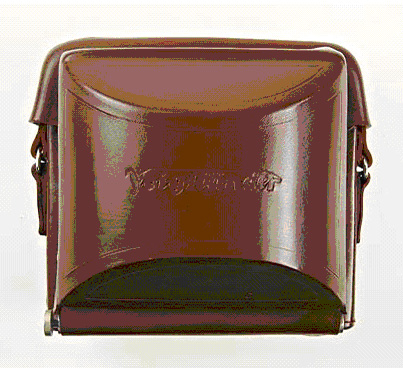
Closed flash case
xxxxxxxxxxxxxxxxxxxxxxxxxxxxxxxxxxxxxxxxxxxxxxxxxxxxxxxxxxxxxxxx
Made by Carl Weiss Braunsweig
xxxxxxxxxxxxxxxxxxxxxxxxxxxxxxxxxxxxxxxxxxxxxxxxxxxxxxxxxxxxxxx
These are
reincarnations of the Prominent body:
Pre-run prototype of VitoIII in rigid body version
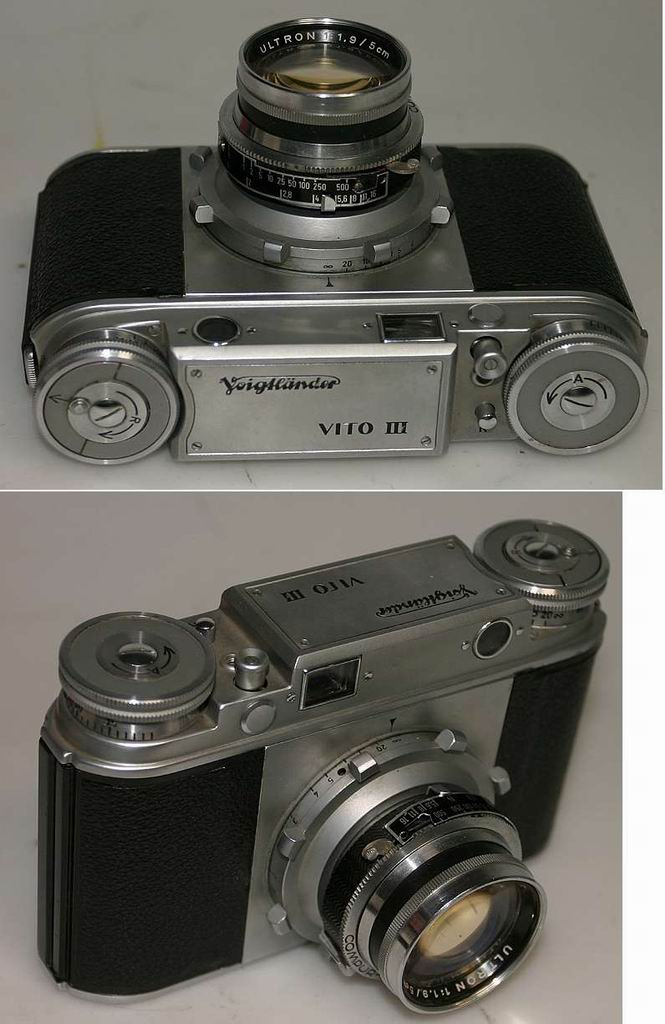
Commercial type of VitoIII in
foldable bellows type. Ultron f2 lens for both models
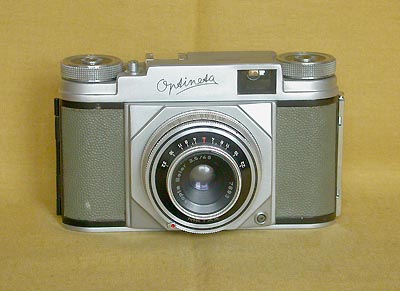
Optineta made by Meopta Czech Republic after the Vito and Prominent demise.
Uses same (refurbished) tools. This camera also
had a very limited sales. Pehaps,
their visual style did not convince the public
of their intrinsec superior quality